Tuesday, February 19, 2008

Getting Started

First of all I like to thanks all my friends for their inspiring feedbacks. Keep it like that I get lots of enegry form them. Thankssssssssss...... Again.

Getting Started


Selecting a Micro
There are two family of microcontroller that are extremely popular among hobbyist. The “PIC” series from Microchip and “AVR” series from Atmel. Both these chips are wonder of modern microelectronics. PIC had ruled for a long time but now AVR is also getting in serious competition.

Speed and ease of use.
I prefer AVRs because one major reason. They are fast. When a PIC and an AVR is running with same frequency lets say 12 MHz, then the AVR is actually executing four times faster than the PIC ! Yes 4 times faster. This is because the PIC requires 4 cycle to perform a single execute cycle while the AVR execute most of the instruction in 1 clock cycle.

In addition, I like the AVR architecture because of its consistency. It makes using the most advanced feature of AVR very easy to use. These chips are easily available and they are cheap.

Free “C” compiler.
One more important thing, generally microcontroller programs are written in assembly language for efficiency. Which you may know is a very low level and unstructured language. Therefore, to achieve a small thing lots of code need to be written and the programmer cannot concentrate on program logic. This makes the things harder. However, mid to high end AVR mcus are powerful enough to support high level language such as C efficiently. To write programs in ‘c’ for AVR or any other microcontroller we need a c compiler for that MCU. Generally these compilers are priced so high that they are out of reach of hobbyist and small company. But fortunately for AVR mcus there is a very high quality ‘c’ compiler for free. It is GNU C compiler. It is extremely popular and it has a large user base. It is part of the free and open source software revolution that we are witnessing (like Linux, PHP, Apache, OpenOffice.org etc). Providing excellent software at no cost. They are the dedicated work of programmers around the globe.

Different AVRs
Now we have selected AVR as our choice of micro lets see what different AVRs are available. The popular micros of AVR family are
AT TINY2313 [20 PIN, 2K Flash ,128 Byte RAM, 128 Bytes EEPROM]
AT MEGA8 [28 PIN , 8K Flash , 1KB Ram, 512 Byte EEPROM]
AT MEGA16 [ 40 PIN, 16K Flash, 1KB Ram, 512 Byte EEPROM]
AT MEGA32 [ 40 PIN, 32K Flash, 2KB Ram, 1KB EEPROM]
You can choose any one of them according to your need. The concepts you learn from one MCU can be easily applied for any AVR provided that chip has that functionality. For Example you learned to use ADC (analogue to digital converter) on MEGA8 then you can easily use ADC on any AVR that has one (like MEGA16 or MEGA32).

In this tutorial series we will be using AT MEGA8 because it has right combination of size, cost and features. It has lots of RAM and Flash to make moderate sized project with ease. Also it has many on chip peripherals like

  • Timers with PWM.
  • Serial Communication
  1. USART for connection with PC and other micros

  2. SPI can be used for connection with other chips like DataFlash, Graphical LCD, MemoryCards.

  3. TWI
  • Analogue to Digital Converter.
    If you don’t understand the above features no need to worry. Each will be having it own dedicated tutorials. Just understand they are integrated inside the chip to make your life easier.

Tools Required


The development process of AVR or any other MCU looks like this

Therefore, the tools you need are

Hardware:

  • A PC running Win98 or Better.
  • An In-System programmer (ISP): This is the device which connects your mcu to your PC .You can easily make a serial or parallel port programmer. You can also make a USB programmer (little complicated) or buy one.
  • A Target Board: It is nothing but you project which has an ISP header so that programmer can be connected and detached easily. In most simple case, it has a MCU with its power supply, a few basic connections, and ISP header.Last but not the least an AVR MCU.

Software:

  • A C compiler (free)
    This will compile your program which is written in a high-level language to machine language. After successful compilation and build you will get a file with .hex which you have to burn into the MCU’s flash
  • A programmer software free (free)
    This software will help you burn the above mentioned hex file to mcu flash.

That is all for now. In next tutorial, I will tell you how to make a simple programmer, basic AVR board, write and compile your first program, and then burn it to MCU to watch it gooooo…

Avinash Gupta

Friday, February 15, 2008

Introduction

Just what is a microcontroller?
To get you understand quickly I define a microcontroller as a single chip computer.Yes it is a full blown computer in its own. It has a C.P.U., RAM,some amount of EEPROM(for secondary storage i.e. permanent storage without power), many on-chip peripherals(Timer,Serial communication, Analogue to Digital converters etc.).If you don't understand, no problem I will be dealing them in detail in next tutorials. But compared to a P.C. their resources(RAM,speed etc)are less.But that is what is required !!! Because P.C. is a general purpose computer, which means it can run thousands of different softwares that are available for specific needs.Like it can run a game.The same P.C. can run this browser in which you are reading this!It can run a custom solution for banks,railways and airways.It can run a 3D modeling,video editing & image editing software for a production company. Many of these are huge software,requiring lots of memory and CPU power.And a P.C. can run simultaneously many of this !!! So to run them the host computer should have enough RAM and CPU power so that it can run heaviest of them.
But in case of a microcontroller(aka MCU) which is used for a specific purpose like switching a Microwave oven heating off after a preset time,and also when tempereture exceed preset value.


This design also involve controlling few indicator L.E.D. , 2 or 3 seven segment display, few switches and a relay controlling the oven.This doesn't need a monster with 3.2 GHz Intel Core 2 Quad extreme processor with 2 GB Dual channed DDR3 RAM, 320 GB HDD and Dedicated nVIDIA GEFORCE graphics !!!. What is of main concern is cost and size.What it will be running through out its life is a simple program that is hardly more than 4KB in size, requiring less than 128 Bytes of RAM to store few varriables and optionaly a few bytes to store permantly the temperature and time set on last use so that it can read those on statup.Other Example where MCUs are used are

  • Pendrives(for controlling the communication between P.C. and Flash Chip and also the small LED!)
  • Hardisks( again for the same purpose)
  • Mouse(Reads and Interprets the Sensors and send final result to P.C.),Keyboards.
  • Printers : Ever opened a printer for installing ink cartridge ? Then you must have seen the printed head. There are motors to control the print head and the paper movement. Your P.C. is not directly connected to them but the in-built MCU of printer control all these. Your P.C. just sends the data(pixels) through the communication line(USB or parallel).But the MCU used here is fairly fast and has lots of RAM.
  • Automobiles
  • Calculators,Electronic wending machines, Electronic weighing scales, Phones(digital with LCD and phonebook)
  • Cell phones
  • Any thing that is small, but has great functions and is cheap !!!

They are every where !!!
A Simple MCU based system.
A simplest MCU system may look like below

The program it is executing is like this( In C language).The MCU contains a flash memory where it stores its program(its like a hard disk to it). The flash memory can be easily erased and a new program can burned. This makes them very flexible. MCUs can be programmed few thousand times before they die.


void main()
{ 
    SetPortDirection();     
 while(1)     
 {      
 PORTA=0b00000001;
 Delay(0.5);      
 PORTA=0b00000000;      
 Delay(0.5);     
 }
}


A MCU has some ports.Ports are PINs on the MCU that can be turned on and off by program.By on I mean 5V and off means 0V or GND.This behaviour is for OUTPUT mode. They can also be put in INPUT mode. In INPUT mode they can read what is the signal level on them (only on and off).If voltage is more than a threshold voltage(usually half the supply) it is reported as ON(1) otherwise OFF(0).This is how MCU control everything.Majority of the PINs of a MCU are PORT so you can hookup lots of gizmos to it !!!They are named PORTA,PORTB,PORTC,PORTD etc.They are of one byte which means 8 Bits.Generaly all bits of them are connected to external pins and are available outside the chip.In smaller chips only some of the eigth bits are available.
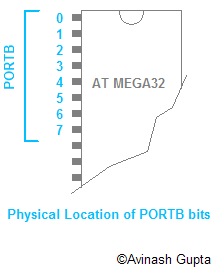
For example the image shows the PORTB and it bit numbering.Setting PORTB=0b00000001 will set PORTB's zeroth bit high that is 5V while remaining PINs will be low(GND).
[NOTE:To write a binary number in c prefix it with 0b ex 0b00001000. It is decima 8 not 1000 !!! ]
The program above is not complete program it is just a pseudo-code.So it won't compile.Also you may be wondering where it will be entered, compiled and how the heck it will pushed into that chip?They are the subject of next tutorails and I will be covering them in detail.
What the program does :
STEP 1 SetPortDirection();
This Function Makes the PORTB as OUTPUT.Its implementation detail is not shown.
STEP 2 PORTB=0b00000001;
makes the 0th bit high, switching off the L.E.D. because other end of LED is connected to VCC(i.e. Supply voltage 5V)
STEP 3 Delay(0.5);
Halts the MCU for 0.5 Sec
STEP 4 PORTB=0b00000000;
Switches on the LED
STEP 5 Delay(0.5);

STEP 2 to 5 are within an infinite while loop so it runs till MCU is powered.
The program is compiled, and burned into the chip and power is turned on and woillaaaa that LED is blinking once every second.You have just understood the "HELLO WORLD" program for MCU empire.Although the given program doesn't do something very important and can be done without a MCU and in a cheap manner, but it introduce you to microcontroller programming.Doing this with MCU has some advantages also.You can change the way LED blinks by simply writting a new program without touching the harware part.You can also connect 8 LEDs to all 8 PINs of the PORTB, write a nice program them to light them in varrious pattern and you have a delux decorating lights !!! Which you can't make easily withou MCUs.So you have seen that major functioning of a MCU project are made in software and hardware part is simple and small.
So you have learned the basics of MCUs and their use.Hope you have nice time reading.So, good bye for now, we will meet in next tutorial.


By
Avinash Gupta

Welcome

Hello Everyone
Welcome to my blog. Here we learn about those wonderful, little chips called microcontroller. They are inside almost every modern electronic devices. And learning to use them gives immense power in your hands.

You must have some knowledge about basic electronics and computer programming to get all these.